A loose timing belt can cause noise, poor running, or lost engine timing. Ignore it, and the belt may jump teeth or damage the engine. The solution is to inspect the system, confirm the timing marks, and adjust only a serviceable tensioner according to the engine manufacturer’s procedure.
You can adjust a timing belt without removing it only when the engine uses an adjustable tensioner and the belt remains correctly seated, undamaged, and properly timed. You will normally need to remove part of the timing belt cover, set the engine at top dead center, loosen the tensioner, set the specified tension, tighten it correctly, rotate the crankshaft manually, and recheck every timing mark.
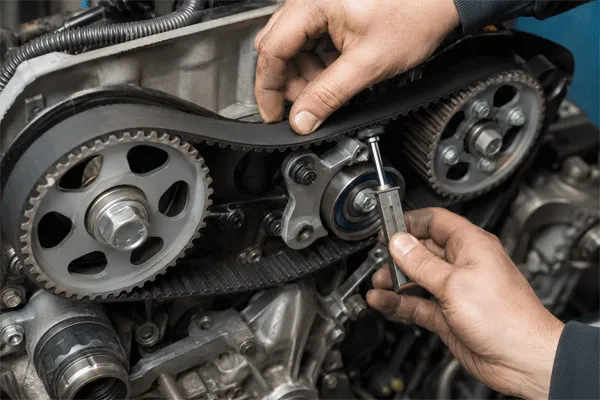
How to Adjust a Timing Belt Without Removing It: Tensioner, Belt Tension, and Camshaft Timing Guide
Can You Adjust a Timing Belt Without Taking It Off?
In some engines, yes. You may be able to adjust the timing belt without removing it when the system has a manual or eccentric tensioner. In this design, a technician can loosen the tensioner slightly, reposition it, set the correct belt tension, and tighten the fastener again.
However, many modern timing systems use an automatic, hydraulic, or spring-loaded tensioner. These systems are not normally adjusted like an older manual tensioner. Continental describes automotive timing belts as maintenance-free components that generally do not require routine retensioning. When tension is incorrect in such a system, the proper repair may be to replace the tensioner, idler, belt, or complete timing kit.
Use this decision table before starting:
| Belt condition |
Tensioner type |
Recommended action |
| Belt is in good condition and timing marks align |
Manual or eccentric tensioner |
Adjustment may be possible |
| Belt is in good condition |
Automatic or hydraulic tensioner |
Diagnose the tensioner; do not force an adjustment |
| Old timing belt shows cracking, glazing, or damaged teeth |
Any type |
Replace the belt and related components |
| Belt has oil or coolant contamination |
Any type |
Repair the leak and install a new timing belt |
| Belt has jumped a tooth |
Any type |
Retime and inspect the full system |
| Tensioner pulley is noisy or loose |
Any type |
Replace the tensioner or pulley |
| Water pump is leaking or rough |
Belt-driven water pump |
Replace the pump and timing components as required |
The key point is simple: adjusting tension cannot repair a worn, contaminated, stretched, or damaged belt.
Why Do Timing Belt Tension and Camshaft Timing Matter?
The timing belt keeps the camshaft and crankshaft synchronized. The crank controls piston movement, while the cam opens and closes each valve. Both must remain in the correct relationship as the engine turns.
When the belt is too loose, it may vibrate, flap, or move across the pulley incorrectly. In severe cases, it can jump one tooth or more. When the belt is too tight, it can overload the tensioner pulley, cam gear, water pump bearing, and crankshaft components.
Incorrect camshaft timing may cause:
- Hard starting
- Uneven idle
- Low engine power
- Misfire
- Unusual mechanical noise
- Check-engine warnings
- Camshaft or crankshaft correlation faults
- Increased fuel consumption
- Valve-to-piston contact on some engines
An interference engine has very little clearance between the valves and pistons. If the timing belt breaks or the cam and crank move out of synchronization, internal contact may occur. Gates warns that a broken belt can lead to serious engine damage, and its engine-specific instructions identify certain engines where valve-to-piston damage is likely after belt failure.
That is why you should never estimate the correct position by sight alone. Every timing mark must match the manufacturer’s reference.
What Tools Do You Need to Adjust the Timing Belt?
The exact tools depend on the engine. Some engines use ordinary hand tools. Others require special locking pins, tension gauges, or cam gear holding tools.
A typical tool list may include:
- Vehicle-specific service manual
- Socket set
- Combination wrench
- Breaker bar
- Torque wrench
- Crankshaft turning tool
- Camshaft locking tool
- Crankshaft locking pin
- Tensioner adjustment tool
- Allen or hex key
- Inspection lamp
- Jack and approved safety stands
- Engine support fixture when an engine mount must be removed
- Paint marker for temporary reference marks
Do not use the paint marks as a replacement for the factory timing mark. They can help you track movement during inspection, but the final crankshaft timing and camshaft timing must match the official references.
Some applications use a frequency-based tension tester rather than a simple pointer. Continental recommends following the automaker’s fitting instructions, using the specified tools, and setting tension with an approved measuring device where required. It also warns against forcing or bending the belt because this can damage its internal tensile cords.
Basic safety preparation
Before working at the front of the engine:
- Park on a firm, level surface.
- Apply the parking brake.
- Allow the engine to cool completely.
- Disconnect the battery when required by the service procedure.
- Remove the ignition key.
- Support the vehicle correctly.
- Support the engine before removing a motor mount or engine mount.
- Keep tools, clothing, and hands away from rotating components.
Never start the engine while the timing cover is removed unless the official procedure specifically requires it and all rotating areas are safely controlled.
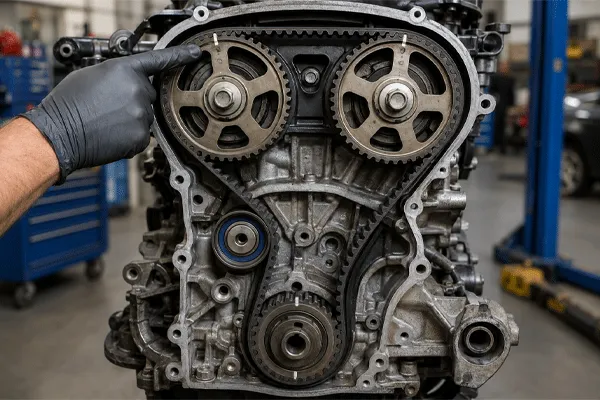
How to Adjust a Timing Belt Without Removing It: Tensioner, Belt Tension, and Camshaft Timing Guide
How Do You Access the Timing Belt Without Removing It?
To access the timing belt, you will usually remove the upper timing belt cover. Depending on the engine layout, you may also need to remove an intake duct, accessory belt, engine splash shield, coolant reservoir, crank pulley, or mounting bracket.
Some transverse engines place the belt close to the body structure. In these vehicles, the engine mount may pass through or beside the timing cover. Support the engine before loosening that mount. Never allow the engine’s weight to hang from the remaining mounts, hoses, wiring, or exhaust system.
For a basic inspection, removing the upper timing belt cover may provide enough access to see:
- The cam gear
- Belt teeth
- Belt edge condition
- Tensioner pointer
- Oil or coolant contamination
- Belt tracking
- Cam timing mark
A full adjustment may require more access. You may need to remove the timing belt cover sections near the crank pulley or tensioner. Do not cut, bend, or force the timing cover away from the engine.
If the lower timing belt area cannot be inspected, do not assume the crankshaft mark is correct. Partial access is useful for diagnosis, but it may not be enough to safely adjust the timing belt.
How Do You Set the Cam and Crank at Top Dead Center?
Before you loosen the tensioner, rotate the engine by hand until the specified cylinder reaches top dead center, often written as TDC. Most procedures use cylinder number one on its compression stroke, but you must verify this in the service manual.
Place the correct socket and wrench or breaker bar on the crankshaft bolt. Rotate the crankshaft slowly in the normal direction of engine operation. Do not turn it backward unless the manufacturer allows it.
Check that:
- The crankshaft timing mark aligns with its reference
- The camshaft timing mark aligns with the cylinder head or rear cover
- Additional cam marks align on dual-cam engines
- The tensioner pointer is within its specified range
- The marks line up at the same time
Some engines use locking tools instead of visible marks. Others use a mark on the pulley, a mark behind the crankshaft pulley, or a pin that enters the engine block at the correct position.
Never rely only on a mark painted on the crank pulley. Some crank pulleys contain bonded rubber that can deteriorate and allow the outer ring to move.
Do not rotate the camshaft and crankshaft separately unless the service manual provides a safe procedure. On an interference engine, independent movement can bring a piston into contact with an open valve.
How Do You Loosen and Adjust the Timing Belt Tensioner?
First identify the tensioner design. A manual timing belt tensioner may use an eccentric pulley, sliding bracket, tensioner spring, or adjustable water pump. An automatic unit may contain an internal spring or hydraulic damper.
For an adjustable system, the general procedure is:
- Set the engine at the specified TDC position.
- Install cam and crank locking tools when required.
- Confirm that every timing mark is aligned.
- Locate the tensioner pulley and its retaining fastener.
- Support or hold the tensioner with the correct tool.
- Loosen the tensioner fastener only enough to permit controlled movement.
- Allow the tensioner spring to act, or rotate the eccentric in the specified direction.
- Set the pointer or belt tension to the specified position.
- Hold the tensioner steady.
- Tighten the fastener with a torque wrench to the vehicle-specific value.
Do not fully remove the tensioner bolt unless the procedure calls for removal. Do not force the tensioner away from the belt with a screwdriver. This can damage the pulley, belt teeth, rear cover, or tensioner mounting surface.
Gates publishes engine-specific procedures showing how widely these systems differ. One tensioner uses an Allen key to relieve pressure before the belt is positioned, while another requires the pointer to align with a specified mark after two manual crankshaft revolutions. This is why a universal adjustment direction or torque value would be unsafe.
Manual versus automatic tensioners
| Tensioner system |
Can it normally be adjusted? |
Typical response to incorrect tension |
| Eccentric manual tensioner |
Yes, if serviceable |
Reposition and torque correctly |
| Sliding manual tensioner |
Often |
Set tension with specified tool |
| Adjustable water pump system |
Engine-specific |
Rotate pump according to manual |
| Spring-loaded tensioner |
Sometimes preset during installation |
Inspect pointer and spring condition |
| Hydraulic tensioner |
Usually not manually adjusted |
Test or replace the unit |
| Sealed automatic tensioner |
Usually not |
Replace defective components |
How Do You Check Timing Belt Tension After Adjustment?
After tightening the tensioner, remove the locking tools according to the service manual. Use the crankshaft bolt to rotate the crankshaft slowly through two complete revolutions in its normal direction.
This step distributes the tension around the entire belt path. It also confirms that the pistons and valves can move through a full cycle without mechanical interference.
Return the crank to TDC and inspect the following:
- Crankshaft timing mark
- Camshaft timing mark
- Secondary cam marks
- Tensioner pointer
- Belt position on every pulley
- Belt tension on the non-tensioned side
- Clearance between the belt and timing cover
- Wiring near the crankshaft position sensor
If any timing mark does not realign, stop. Do not start the engine. The belt may have moved during adjustment, the tension may be wrong, or a pulley may not be seated correctly.
Some manufacturer procedures specifically instruct the technician to make two manual engine revolutions, return to TDC, and adjust again if the tensioner reference is not aligned.
Do not use the old “twist the belt 90 degrees” rule unless the service manual permits it. Belt width, span length, tooth design, material, and tensioner architecture vary too much for this method to work on every engine.
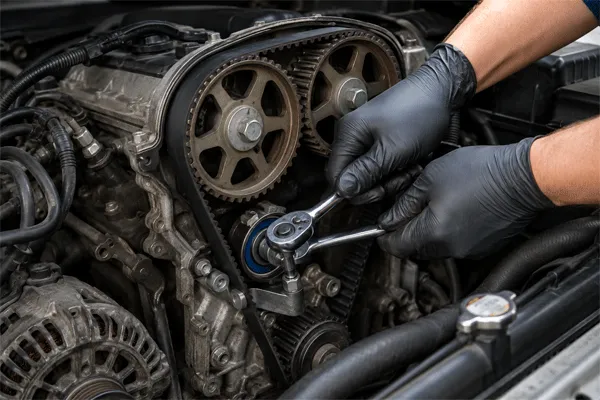
How to Adjust a Timing Belt Without Removing It: Tensioner, Belt Tension, and Camshaft Timing Guide
When Should You Install a New Timing Belt Instead of Adjusting It?
Adjustment is suitable only when the belt and related parts remain serviceable. Install a new timing belt when you find structural damage, excessive age, unknown maintenance history, or contamination.
Replace rather than adjust when you see:
- Cracks on the back of the belt
- Missing, rounded, or damaged teeth
- Frayed edges
- Exposed internal cords
- Oil contamination
- Coolant contamination
- Glazed or hardened rubber
- Belt tracking against a flange
- Loose or noisy idler bearings
- A leaking water pump
- A weak or damaged tensioner spring
- A tensioner pointer outside its normal range
- Evidence that the belt jumped a tooth
- An old timing belt near or beyond its replacement interval
When changing the system, many manufacturers recommend replacing the belt, tensioning pulley, idlers, and possibly the water pump together. Continental advises replacing the tensioning components and considering the water pump when it is driven by the timing system.
A leaking water pump requires special attention. If the timing belt drives the pump, replacing the pump later means repeating much of the same labor. A new gasket or approved sealant must be installed exactly as specified. Too much sealant can also create problems; Continental’s engine-specific instructions warn that excessive sealant may affect the pump’s mechanical seal.
Never reuse a damaged belt. Do not slide the belt over a pulley with a pry bar, and do not slip the belt sideways to move it one tooth.
What Should You Do If the Timing Belt Jumped a Tooth?
A belt that has jumped a tooth has a timing problem, not merely a tension problem. Tightening it without correcting the position will leave the camshaft and crankshaft out of synchronization.
Common signs include:
- Engine cranks but does not start
- Sudden loss of power
- Rough idle
- Backfiring
- Cam and crank correlation fault codes
- Unusual valve-train noise
- Timing marks that no longer align
- Low compression in one or more cylinders
Do not try to move the belt by pulling it sideways while it remains fully tensioned. In most cases, you must release the tension, reposition or remove the timing belt, inspect the teeth and pulleys, reset the crank and cam positions, and restore the correct tension.
The cause must also be identified. A belt may jump because of:
- Weak tensioner
- Seized tensioner pulley
- Damaged teeth
- Oil contamination
- Incorrect previous installation
- Loose retaining bolt
- Water pump seizure
- Foreign material inside the timing cover
If the engine stopped suddenly or now turns unusually fast during cranking, arrange a compression or cylinder leak-down test before continuing. A broken timing belt or severe timing error may have damaged the cylinder head, valves, pistons, or camshaft components.
What Are the Most Common Timing Belt Adjustment Mistakes?
The most serious mistake is treating every engine the same. Tensioner direction, pointer position, torque, locking method, and timing-mark layout can differ even between engines from the same manufacturer.
Avoid these common errors:
- Adjusting a worn belt instead of replacing it
More tension does not restore damaged rubber or teeth.
- Using generic torque specifications
Incorrect torque may loosen the fastener or damage the threads.
- Setting only the cam mark
Both cam and crank references must align.
- Rotating the engine with the starter
Always perform the first verification by hand.
- Turning the engine backward
Reverse movement may alter tension distribution.
- Removing an engine mount without supporting the engine
This can damage mounts, hoses, wiring, and brackets.
- Forcing the tensioner pulley
Use the correct adjustment point and tool.
- Ignoring oil or coolant leaks
Contamination can shorten belt life and contribute to failure.
- Installing the timing cover before verification
Rotate and recheck first.
- Reusing an old tensioner with a new belt
A weak tensioner can damage the new timing components.
Quick risk chart
| Action |
Risk level |
Better choice |
| Inspecting through the upper cover |
Low |
Follow the manual and keep the engine off |
| Adjusting a manual tensioner with correct tools |
Moderate |
Verify marks and torque |
| Adjusting an automatic tensioner by force |
High |
Diagnose and replace if faulty |
| Moving the belt one tooth while tensioned |
Very high |
Release tension and retime correctly |
| Starting before two manual revolutions |
Very high |
Rotate by hand and recheck |
| Reusing a contaminated belt |
Very high |
Repair the leak and replace the belt |
How Does Timing Belt Maintenance Affect Heavy-Duty Fleets?
Semi trailers do not have engine timing belts because they do not contain their own internal combustion engines. However, tractor units, trucks, service vehicles, generators, forklifts, and support equipment within a transport fleet may use a timing belt or another synchronized engine drive.
As a professional semi trailer manufacturer in China, we understand that fleet reliability depends on more than the trailer frame. Operators must coordinate tractor maintenance, trailer inspections, tires, brakes, axles, suspension, electrical systems, and supporting equipment.
For container logistics, construction, mining, fuel transport, and infrastructure projects, a single breakdown can interrupt an entire transport schedule. Fleet owners should therefore record:
- Engine model and serial number
- Timing-system type
- Belt replacement interval
- Last replacement date
- Tensioner and water-pump replacement history
- Parts brand and part number
- Technician name
- Torque and inspection records
- Next planned service date
Our main expertise remains the design, production, customization, and export of heavy-duty transportation equipment, including flatbed, skeleton, sidewall, lowbed, tanker, dump, and car carrier trailers. For engine-internal work, fleet customers should use qualified technicians and the official truck or engine manufacturer’s service information.
Illustrative fleet maintenance case
A construction fleet notices a light rattling noise from the front of one support truck’s engine. The technician removes the upper cover and finds that the tensioner pointer is outside its specified range. The belt is also contaminated by a small coolant leak.
Simply adjusting the timing belt tension would not solve the root problem. The correct maintenance plan is to identify the leak, inspect the water pump and pulleys, replace affected components, set new timing, rotate the engine manually, and document the repair.
That approach costs more than a quick adjustment. It also reduces the risk of an unplanned shutdown at a construction or mining site.
Frequently Asked Questions
Can I tighten a timing belt without removing the timing cover?
Usually, you must remove at least the upper timing cover to inspect the belt, timing marks, and tensioner. Some engines require additional cover sections, the crank pulley, or an engine mount to reach the adjustment mechanism.
How tight should a timing belt be?
There is no universal setting. Some engines use a tensioner pointer, some use a spring, and others require a frequency or deflection measurement. Use the vehicle’s service manual rather than estimating by hand.
Can a loose timing belt be adjusted safely?
It can be adjusted when the engine has a serviceable manual tensioner and the belt is undamaged and correctly timed. If the system uses an automatic tensioner, incorrect tension often indicates a faulty component that should be replaced.
Can I adjust a belt that has jumped one tooth?
Do not simply tighten it. Release the tension, reset the crank and cam positions, inspect the teeth and pulleys, and determine why it jumped. Some engines may also need a compression test.
Should I replace the tensioner with a new timing belt?
In many applications, yes. The tensioner and idler bearings have operated for the same period as the old belt. A complete timing kit helps prevent an old pulley or tensioner from damaging the new belt.
Can incorrect belt tension damage the water pump?
Yes. Excessive tension can increase bearing load, while insufficient tension can cause vibration or poor tracking. This is especially important when the water pump forms part of the timing belt path.
Conclusion: What to Remember
- You can adjust a timing belt without taking it off only on certain engine designs.
- Confirm that the engine uses an adjustable tensioner before attempting the work.
- Remove enough of the timing belt cover to inspect the belt, marks, pulleys, and tensioner.
- Set the engine to the specified TDC position before loosening anything.
- Verify both camshaft and crankshaft timing.
- Never use a generic torque value.
- Rotate the engine manually through two complete revolutions after adjustment.
- Recheck every timing mark and the tensioner pointer.
- Do not start the engine when the marks fail to realign.
- Replace an old, damaged, noisy, or contaminated system instead of tightening it.
- Treat a belt that jumped a tooth as a timing-system fault.
- Use professional engine technicians for complex or interference-engine repairs.
- Include tractor and support-vehicle engine maintenance in the wider fleet maintenance plan.












 16:58
16:58